Showing posts with label Homemade Products. Show all posts

Monday, February 13, 2012

Homemade Laundry Soap

Part of my plan for 2012 (original post found here) is to use up all the products I have on hand...and when those run out...make as many similar products myself that I can.

So far, I've made leave-in conditioner, wallpaper remover, and coffee creamer. The latest on my list...laundry soap. I was able to buy everything to make it at the grocery store for less than $15. The only other cost was for the storage container (I splurged on a pretty glass one from Target, $14), tablespoon to measure it out (I bought a whole set of measuring cups and spoons at Dollar Tree, $1), and a cheese grater (Dollar Tree, $1). I had a bucket and old spoon (for mixing) on hand...so those were free!

*Ingredients: 2 small boxes baking soda (baking aisle), 2 containers oxygen laundry booster, 3 Fels-Naptha laundry bars, 1 4lb 12oz box Borax, 1 55oz box Amr & Hammer Super Washing Soda (everthing other than the baking soda...found in detergent aisle).


1. Line bucket with trash bag...grate Fels-Naptha laundry bar into the bucket. Took maybe 10 minutes...not as long as I thought it would. Smelled amaze...and looked a lot like a yummy pile of cheddar...

2. Once the laundry bar is grated...add other ingredients...mixing after each. I put a bit of duck tape on the end of my spoon so I'll know it's one only to use for crafting. After all the ingredients are in your bucket...mix, mix, mix.

3. Transfer the trash bag to whatever container you're going to store the laundry soap in. This part is a bit tricky. Once the bag is in the container...you'll have to tear a whole in the bottom...then the soap will pour out. The last thing I did...just to pretty it up a little...was to tie a ribbon around the lip of the jar. Then I connected the tablespoon to the ribbon w/ the ring that came w/the $1 set I bought.

1 tablespoon is all it takes per load of laundry. I still have some of my liquid detergent left...so I won't be using this right away. I'll let you know when I start so we can see how long it lasts!

~Hilary~

*I found this 'recipe' on Pinterest. Original post found here.


Wednesday, January 25, 2012

Homemade Coffee Creamer

A Keurig coffeemaker has come to
live @ our house. So...not only is there
a new need to buy tons of tiny coffees...but
also the creamers to make them taste good.

This is well and good...but all these delish things can make the grocery bill go up! Pinterest (duh) to the rescue!

Now...I'm in no way going to pretend I can make my own K cups...but I can (and did) make my own creamer.

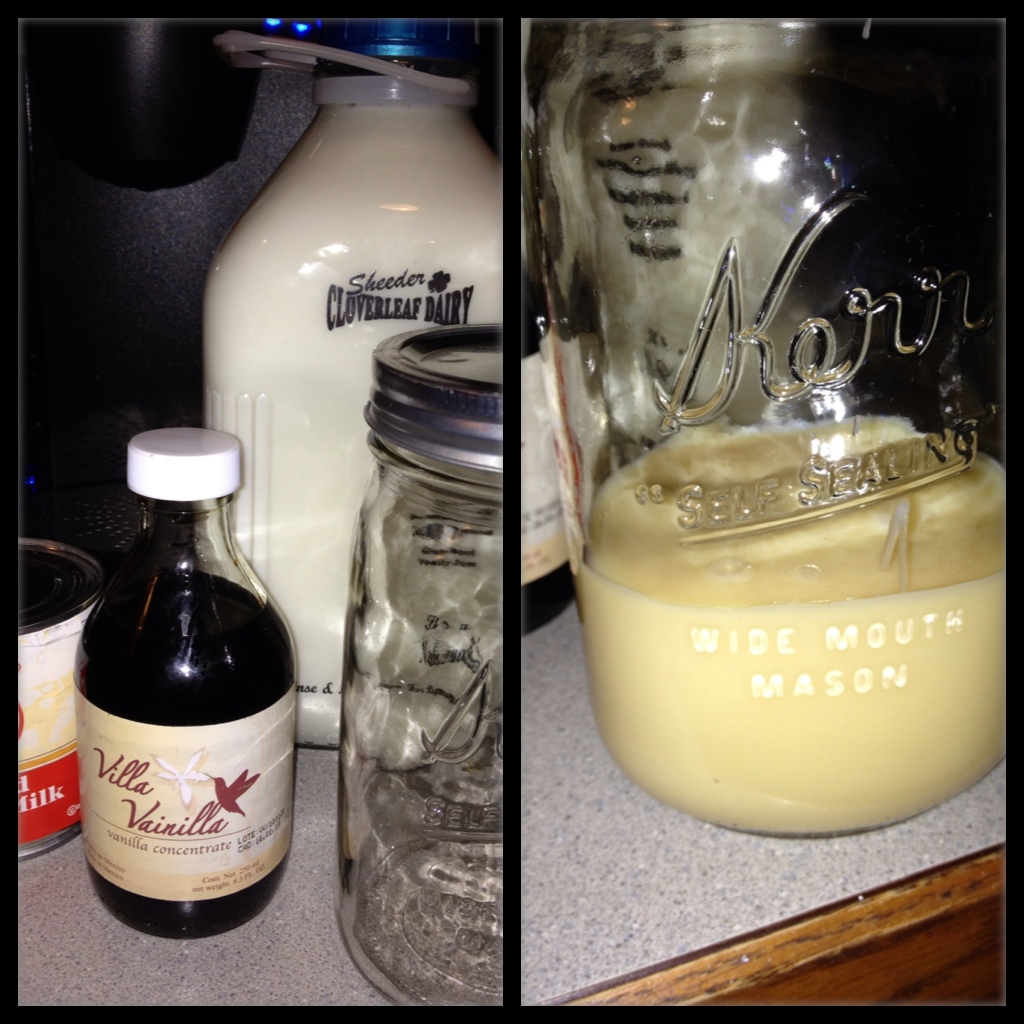
Ingredients:

-1 14oz can sweetened condensed milk
-14 oz milk (just pour it into the condensed milk can for a perfect measure)
-2 tsp. vanilla extract (or any flavor syrup you prefer)
-1 qt. Mason jar


1. Pour sweetened condensed milk into jar (& lick the spoon...this stuff's sooo yummy!).


2. Pour milk into condensed milk can (easy to measure that way) and then add to the jar.


3. Add vanilla extract (or whatever flavor you choose) and shake it up. The Hubs pretended it was a Shake Weight...what a workout, right?

The cost of a 16oz creamer at most local stores is $2.19 (about $0.14 cents per ounce). To make my own creamer costs about $0.08 cents per ounce. Now...that doesn't really seem like that big of a deal...but when you figure I made 28 ounces of creamer at a
6-cent-per-ounce savings...that makes a total savings of $1.68. Nothing huge...but it's money in my pocket, nonetheless.

~Hilary~

*Original recipe found over here.


Monday, January 9, 2012

Wallpaper...Terrible, Terrible Wallpaper

For starters...I do not claim to be an expert on this...but experience has given me a bit of know how in the realm of tearing down wallpaper. Moving into a house built in 1973 has given us lots (and lots and lots) of opportunities to change some *ahem* dated features.

The worst one...wallpaper. It was everywhere. The entire entryway, hallway, and kitchen. Then, upstairs in 2 rooms...and the basement bathroom. I understand...it was the thing to do...we had it in our house growing up. The bad thing, though...it's not really cool anymore. Unless it's some chic graphic print...and you know 'ours' wasn't. It was dolphins, tiny green flowers, bunnies, butterflies...need I go on?

Anyhoo...the main level of our house got a fresh coat of paint straight away...wallpaper torn down. The upstairs and basement were a whole other story. I mean...no one really sees those places, except for us, so what's the big deal? Until now. We've been on over-haul the last year...attempting to redo all the untouched spaces.

This last weekend, we made steps to finally finish the last room *yahoo!*. You can see the uggo buggo wallpaper in this post. We haven't really done anything else spectacular to the room yet. Getting the wallpaper down has been the biggest thing so far, but now I can't wait to get going!

Having torn down so much wallpaper, though, I've learned a few things.

1. You don't need fancy schmancy tools for removing it. We made the mistake of buying a special remover that you're supposed to spray on and then 'tada!' the wallpaper just magically melts off. Well...not so much. My original method has still proven to be the best.

*No gimmicks, no harsh-smelling chemicals...a spray bottle, liquid fabric softener, and hot water are all you need to get the wallpaper down. Fill the bottle about 1/3 of the way up w/ softener...then top off with hot water. Shake it up. There you have it...your own homemade remover.

*The other important tool (other than a scraper) you'll need is this little gadget (you can find it in the wallpaper aisle *perish the thought* at Lowe's, Menards, etc.). You basically run it all over the wallpaper...the little teeth rotate and score the paper so your remover can penetrate and soften the glue.

If you use these items...taking down the dreaded wallpaper should be a pretty simple task. It is time consuming, though...there's just no getting away from that...short of hiring someone...but who would want that job?!?

Hope to have more pics of the room's progress in the next couple of months. Next week...painting (ceiling included...blech).

~Hilary~


Monday, January 2, 2012

Homemade Leave-In Conditioner

Okay...so 1 thing I really want to accomplish in the year 2012 is to be smarter w/ our money. Now...I'm not saying there will not be shopping trips, nail appts., or eating out...but instead, that I'm going to: use up every last bit of things that I have and try to recreate some of my most-used products.

I know that most of us have drawers, closets, cupboards filled with products we've bought, used a few times, and then cast away b/c something brighter and more magical came along. So...this year, my goal is to use up those products. They originally filled a need in my life, and I'm sure that they will again. Here's to you, zillions of lotions, hairsprays, nail polishes, eyeshadows...even cleaning products...you're finally going to get your day in the sun!

Next...once all those things have been used up, I'm going to do my darndest to find a make-it-yourself version of as many products that I can. There are so many great 'recipes' for homemade lotions, cleaners, etc...I think I can come up w/ some very useful things.

The first I've tried (since I ran out of it this week), is leave-in conditioner. I have naturally wavy, thin & fine hair...so I use a lot of this stuff b/f I blowdry. When I found this pin (here) on Pinterest...it really was an 'oh duh' moment. Of course it would be this simple!

All you will need is: a spray bottle (I'm just reusing the empty one I had), conditioner (I had this one left-over b/c I do splurge on a more expensive one...it's amazing...another post, perhaps), and hot water.


I'm not a very precise person...if I don't have to be...so I definitely eye-balled this one. I'm sure there's some scientific way of figuring out how much conditioner to water you need...but I'm not that patient (wouldn't have any idea of how to do it anyway). I just filled the spray bottle about an inch up from the bottom with conditioner (it's not a see-through bottle...so this was a fingers-crossed kind of thing). Then, I ran the water as hot as I could get it, filled it up to the top, screwed the lid back on...and then 'shook it like a polaroid picture' (sorry...couldn't resist).

Voila! Made me some leave-in conditioner for practically nothing. I have no way of knowing how many times I can make this from one bottle of conditioner...but I'm sure it's a lot. The cost of the conditioner was a little more than $3...and I normally pay over $4 for the leave-in spray...so, I'm pretty much saving literal buckets of money here.

Now...I'm just looking around my house for other things I can recreate. This could get interesting!

~Hilary~