Tuesday, January 31, 2012

Crispy Cheddar Chicken

Oh hey, fancy pants meal! What's up?
You have quickly become one of my
favorite dinner delights.

Ingredients:

Chicken
4 large chicken breasts
2 sleeves Ritz crackers
1/4 tsp salt
1/8 tsp pepper
1/2 cup milk (I used buttermilk instead...holla!) 
3 cup colby jack cheese (shredded)
1 tsp parsley flakes

Sauce
1 10 ounce can cream of chicken soup
2 tbsp sour cream
2 tbsp butter

1. Give the crackers a whirl in a food processor...make the finest crumbs you can.

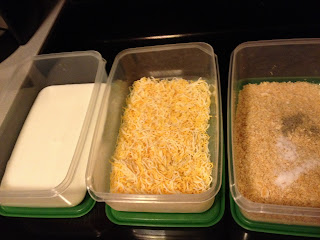
2. I got all of my ingredients ready the nite b/f I was going to make the chicken. This made preparing the dish quick & easy...great for after a long day. I stored everything in long containers...perfect to use in the prep station.

3. Now...I'm pretty sure what made this chicken dinner over-the-top amazing was marinating the chicken overnite in buttermilk. I used about half a quart to marinate...and then the other half to dip the chicken in b/f I coated it. The buttermilk breaks down the chicken...making it soveryjuicy! Coating process...1st: buttermilk, 2nd: shredded cheese, 3rd: cracker crumbs. Then...into a greased 9x13 inch pan...and baked in a 400 degree oven for 30 minutes (covered) and then 10 mins more (uncovered).

4. Once the chicken is browned & yummy...you'll top it off w/the simplest sauce ever. In a small pan, heat cream of chicken soup, sour cream, and butter...mixing until smooth and creamy.

Got to share this tasty treat w/ a couple of great friends...and we all cleared our plates, trust me. Soveryhappy I chose to make extras! Dinner was followed by croissant bread pudding...you can check that out over here.

~Hilary~

*All the props for crispy cheddar chicken belong to the blog, Jamie Cooks It Up!.


Monday, January 30, 2012

Croissant Bread Pudding

Do I need more carbs in my life? No. Do I want them? Yes. What better way to endulge my love of carbs than by making some bread pudding (hello! bread + pudding). The inspiration for making such a decadent, amaze dish came from spying day-old croissants for only $1.25. How could I possibly leave them behind...they had to be put to good use... 


Ingredients:

-3 extra-large whole eggs
-8 extra-large egg yolks (not to fear...the whites were saved for an omelet)
-5 cups half & half (equals a little more than a quart...so I had to buy 2. I plan on using the rest for quiche...you can find that recipe here.)
-1 1/2 cups sugar
-1 1/2 teaspoons pure vanilla extract
-6 croissants, preferably stale
-1 cup raisins (I left these out...not my favorite. I think I'll do chocolate chips next time...how delish!)

1. Separate eggs...I'm not very good at this part
(there was one rogue yolk in w/the whites...woopsie).

2. In a medium bowl, mix eggs, half & half,
sugar, and vanilla extract.

3. Cut the croissants in half...lay the bottoms in
a 9 x 13 in pan. Pour half of the egg mixture on top,
place the tops of the croissants back on...and then pour
on the rest of the mix.

4. The next part is fun...I used all my fanciest
cooking tools... ;) Basically, you need to weigh down the croissants with something heavy so they can absorb all of the yummy custard delight. I let mine sit for about 10 mins.

5. Now...you're ready to bake. You'll need to place your bread pudding dish into a larger pan filled w/ hot water. Then, over the entire thing...make a foil 'tent'...cutting a few holes in the top for steam. In a 350 degree oven, bake (covered) for 45 mins...and then (uncovered) for 40-45 mins. I took mine out after 43 mins...but should have done the full 45 mins (it was still delish...just a little runny).

I thoroughly enjoyed this dessert in every form possible: hot...right out of the oven; warmed up w/ some ice cream and homemade genache; and cold from the fridge.

Pretty much...you need to go to the store (right now), buy some croissants (hopefully day-old), and get to baking!

~Hilary~

*Original recipe found here.


Sunday, January 29, 2012

Sunday Snapshots

1.

2.

3.

4.

5.

6.

7.

8.

1. Chillin...rough life, huh??
2. Tons of clothes...yet, seems like I have nothing to wear...
3. I <3 jewelry...I think it's just pretty to look at.
4. Breakfast smoothie...healthy & delicious! Recipe coming this week. :)
5. My favorite job of Sister's...when she worked @ the Lancome counter. So many freebies! I'm enjoying this moisturizer right now...on my mission to use up everything I have on hand.
6. Raccoon River...so pretty right now. Saw 2 eagles today...amazing!
7. 2 words...queso dip.
8. Used a Groupon (rejoiced in this post) to La Bamba. A success! Paid $8 for $16 worth of deliciousness...total bill today: $16.27. Not.bad.

Gonna change things up a bit for Sunday Snapshots after this week. I'll be sharing pics from the Sunday before...so I can get the post up sooner. Hope to see some great things from all of you!

Don't forget to grab my button on the side of my blog to share! :)

~Hilary~


Daydream Believer


Saturday, January 28, 2012

Brown Thumb

...that's what I have (or maybe even black) when it comes to house plants. I do like to have a little something 'living' around, though...so I'm always trying my hand at some plant or another.

I do have one (soverysad) plant in my kitchen that has been 'alive' since last Valentine's Day. The first couple of blooming cycles, it thrived...w/ the tiniest of pink flowers on it. All it is now, though, is a pitiful few sprigs of greenery...nary a bloom to be found.

Last May, at the wonderland that is IKEA...my mom, sister, and I bought some bamboo. Why wouldn't you buy a living plant at a home furnishings store...makes perfect sense. So...I brought it home, made it a little spot in our main level bathroom...and it's been doing alright. THEN...I put it in the basement over Christmas (didn't really fit the decor). Ever since its stay downstairs...it just hasn't been the same. About a week ago...it turned a sad color of yellow...death.

Sadness...it gave a good fight, though...I really thought it could survive...

There is one piece of the 3 that is still green and nice...so it has a new home by my kitchen sink. We'll see how long this lasts...

So...I needed something new and fresh to take the place of the bamboo (RIP). I've really been wanting to do some sort of terrarium (b/c they're poplular and I have no original ideas)...so off to LOWE's I went. Well...they didn't really have the right kind of plants for said project...but the lady working there talked me into something called a palm.

I had 1/2 of the items needed for the project (vase & rocks).

You can never have enough vases...just don't know when the project bug will strike!

I had to buy the plant ($2.49) and a bag of potting soil ($3.69)...of which I used very little. So...I'm thinking the cost of everything was less than $3.

Everything you'll need to make your own little tropical decorative piece (minus the cat...he's very curious...will probably kill my new plant w/his nibbling).

Sorry...no action shots of actually putting this together. It's so easy, though...pictures & directions might be a bit insulting to your intellegence. ;) All I did was put a little potting soil in the bottom of the vase, placed the plant in (smooshed the root ball down a bit), gently dropped the rocks in...and then gave it a bit of a drink.

I really like how this turned out! Gives the bathroom a little something special. I will prob have to let it get some rays somewhere else from time-to-time...but hopefully (fingerscrossed) it will be ok in this spot.


~Hilary~


Friday, January 27, 2012

My Lowe's

Ok...so everybody buys paint, right? And probably everybody has a stash of old paint cans (a super great way of 'remembering' what color, etc. you used).

Well...I actually think this little program from Lowe's will help alleviate the need to hold on to those buckets of paint. The 'My Lowe's' card (once registered online) will save all of your purchase information from any Lowe's! So, not only will it remember what color of paint you bought...but also building supplies, etc. How cool!


Now...hopefully I can get rid of all this nonsense in my basement...

*Yeah...that's right. Some of these bad boys are from the previous owners! Gotta love that mess...pile of paint cloths and all. Don't judge, y'all.

*And...I can free up these pages in my project notebook! More room for the zillions of magazine pages I seem to accumulate. I'll have that dream house someday, right??

~Hilary~

Thursday, January 26, 2012

Thursdays are for Thankful

Groupon...I may have a slight addiction. This deal was for one of my favorite Mexican restaurants. I def bought it...ok, I bought the limit of 3 per person...


A delightful take on grilled cheese (discovered on Pinterest, of course) using a croissant. Nothing to say but...yumm!

A gorgeous ray of sunshine bursting through the clouds...buh-bye, snow!!

Finally a nite to sit, relax, and clear sme things off of my DVR. Ah....slippers. They're not pretty...but they get the job done.


~Hilary~

Wednesday, January 25, 2012

Homemade Coffee Creamer

A Keurig coffeemaker has come to
live @ our house. So...not only is there
a new need to buy tons of tiny coffees...but
also the creamers to make them taste good.

This is well and good...but all these delish things can make the grocery bill go up! Pinterest (duh) to the rescue!

Now...I'm in no way going to pretend I can make my own K cups...but I can (and did) make my own creamer.

Ingredients:

-1 14oz can sweetened condensed milk
-14 oz milk (just pour it into the condensed milk can for a perfect measure)
-2 tsp. vanilla extract (or any flavor syrup you prefer)
-1 qt. Mason jar


1. Pour sweetened condensed milk into jar (& lick the spoon...this stuff's sooo yummy!).


2. Pour milk into condensed milk can (easy to measure that way) and then add to the jar.


3. Add vanilla extract (or whatever flavor you choose) and shake it up. The Hubs pretended it was a Shake Weight...what a workout, right?

The cost of a 16oz creamer at most local stores is $2.19 (about $0.14 cents per ounce). To make my own creamer costs about $0.08 cents per ounce. Now...that doesn't really seem like that big of a deal...but when you figure I made 28 ounces of creamer at a
6-cent-per-ounce savings...that makes a total savings of $1.68. Nothing huge...but it's money in my pocket, nonetheless.

~Hilary~

*Original recipe found over here.


Tuesday, January 24, 2012

Saturday was a cah-razy busy day,
but also, a lot of fun...so I guess I
shouldn't complain. ;)

*B'fast w/ the Hubs @ Baby Boomers (might be my new favorite). I enjoyed an omelet, hashbrowns...and this
way-delish pancake. Next time...I think I'll just have pancakes...they're amaze!

*Homemade bodywash...a swing and a miss...oopsie! The Hubs just shook his head when I admitted to not using one certain recipe, but instead, combining a few. He's not sure how I've 'lived so long not following the rules.' So...what I ended up w/ isn't quite ready to use as a bodywash...but will be very good as a moisturizing bath oil. Back to the drawing board, I guess.

*Kinda tough to see...but there's a violet streak of hair in there. Katie and I braved another trend (1st were feathers) and had a strip of hair dyed. I like it a lot!


*Took another spin at Glazed Expressions and painted a light switch plate for the bedroom we're working on. Although...at the rate we're going...this little gem may never have a home...

*Oh what's that? Self portrait...my signature...holla!

*Ended the nite w/ some french silk pie (woops...ate the chocolate curls b/f I took the pic) w/ Katie & Erin. Thanks, ladies, for a fun nite! :)

*Whew!* I need a nappy after all of that!

~Hilary~


Monday, January 23, 2012

Cheddar Bay Biscuits

Can't you just taste 'em..the garlic -buttery, flaky deliciousness of those yummy biscuits from Red Lobster...the ones you can just never get enough of??

Well...turns out they're pretty easy to make (and cheap)!


Ingredients:


Biscuits

-2 1/2 c. Bisquick (I used Jiffy Baking Mix...it's the same and a bit cheaper)
-4 tbsp. cold butter
-1 c. shredded cheddar cheese (I used a mix of sharp cheddar and colby jack)
-3/4 c. milk
-1/4 tsp. garlic powder

Butter Topping

-3 tbsp. butter (melted)
-1/2 tsp. garlic powder
-3/4 tsp. dried parsley flakes


1. In a medium mixing bowl, cut butter into the baking mix. At first, I tried to use a couple of forks...but then I wised up and used my Pampered Chef Mix 'N Chop...worked perfectly! You're basically just trying to break the butter up into pea-sized bits...and get them mixed in nicely.

2. Add milk, shredded cheese, garlic powder...and mix. You want to be careful not to over-mix (makes the biscuits tough...instead of light & fluffy).

3. Place in 1/4 cup portions onto a greased baking sheet. Bake in a 400 degree oven for 13-15 mins. Mine baked for 13 minutes...I wanted them to be flaky and delish...not dry.

4. As soon as you pull the biscuits out...you'll brush on the butter topping. It's the melted butter, garlic powder, and parsley flakes mixed together. Then, sprinkle on the tiniest bit of salt.

*Oh mylanta! These actually turned out justtheway they taste at the restaurant! I'm going to have a tough time sharing these tasties...


~Hilary~


P.S...I found the recipe on Pinterest from this blog. Also, I doubled the ingredients...and it made 27 biscuits.


Sunday, January 22, 2012

Sunday Snapshots

1.

2.

3.

4.

5.

6.


1. Breakfast...scrambled eggs
2. Homemade coffee creamer...recipe to come soon!
3. Church starts at 9 a.m...9:02...just getting on the freeway...woopsie! Just a wee-bit late...
4. Skinny jeans, dress, and boots...love!
5. 80" LED t.v. @ Costco...I might want this...a lot...
6. Made in my kitchen, Cheddar Bay Biscuits (ie: the really yummy ones from Red Lobster)...will share this week for sure.

Hoping some of you will link up this week. Would love to see how you spend your Sundays. :)

~Hilary~


Daydream Believer